Multifactor Authentication (MFA) and VPN Support for Students
As a part of ongoing efforts to ensure College data and applications remain secure ITS regularly reviews and updates it security practices.
Currently, Learners at the College have used Entrust for MFA authentication for secure VPN connection to College resources. Moving forward the College has standardized using Azure MFA and will be phasing out Entrust. Learners will use the Microsoft Authenticator App to authenticate connecting to VPN.
Students who already use Microsoft Authenticator for their MFA and are looking for instructions for VPN, please go to Step 4 below.
If you have any problems setting up your MFA, ITS Support is available Mon-Fri 7:30 am – 5:00 pm.
Phone: 613-727-4723 ext. 7221 or 1-866-921-5763 (toll free)
Email: 5555@algonquincollege.com
Instructions for setting up and using MFA
To register for MFA, you will need:
- Your Algonquin College credentials (username and password)
- A mobile device (iOS or Android Phone/Tablet)
- Computer with web browser
- An internet connection
In the following instructions you will login to your Algonquin College account add the MFA authentication method, download, install and set-up MS Authenticator on your mobile device and finish the process.
All of the steps below must be completed for the registration to be successful.
Step 1/4: Sign in and add Multifactor Authentication (MFA) method
Getting started
1. On your computer, open a browser go go to http://liveac.algonquincollege.com/
2. Sign in with your Algonquin College email address and password
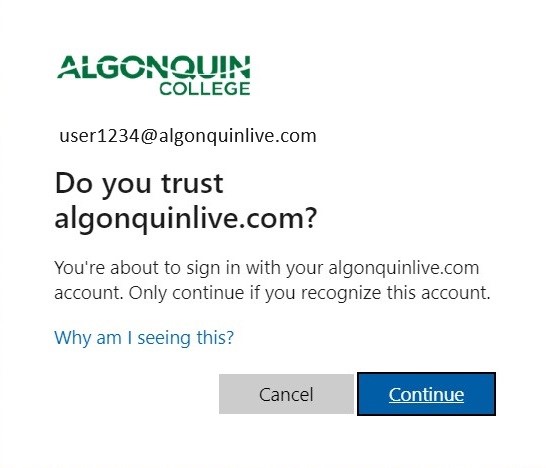
Click ‘Continue’ to trust algonquinlive.com
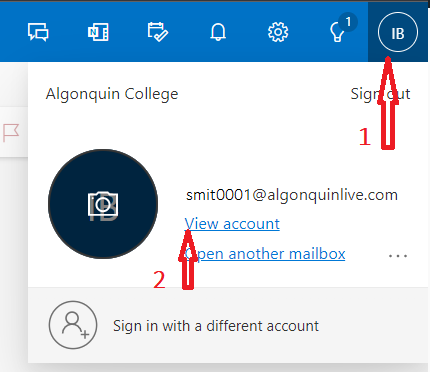
3. You will be signed into your email/outlook on the web. In the top right corner, locate your profile icon (round icon with your initials or photo) and click on it, then click ‘View account’
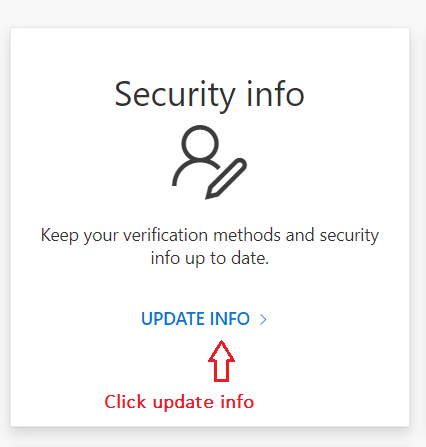
4. On the next page, click ‘Update info’ under ‘Security Info’
5. On the Security Info, you will click the ‘+’ sign to add sign-n method.
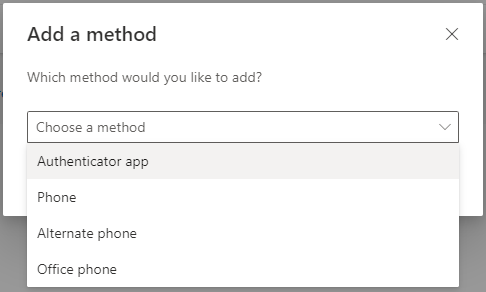
6. From the drop down, select ‘Authenticator App’
7. Select ‘Add’ and proceed to Step 2: Download and Install MS Authenticator. Leave your Browser Window open, you will return to it to complete the setup.
Step 2/4: Download and set up Microsoft Authenticator App
Select the option that matches the version of your mobile device
Android 8.0 or iOS 15.0 and newer and devices with QR scanners
If you have already downloaded Microsoft Authenticator to your mobile device, go to step 4 below.
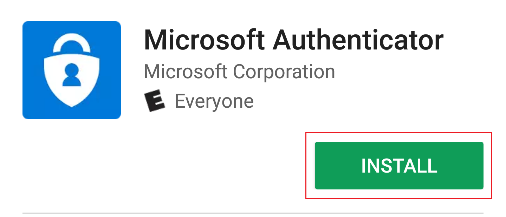
1. Open the app store on your device
2. Search for ‘Microsoft Authenticator’.
3. Select ‘Install’ or ‘Get’, depending on your device.
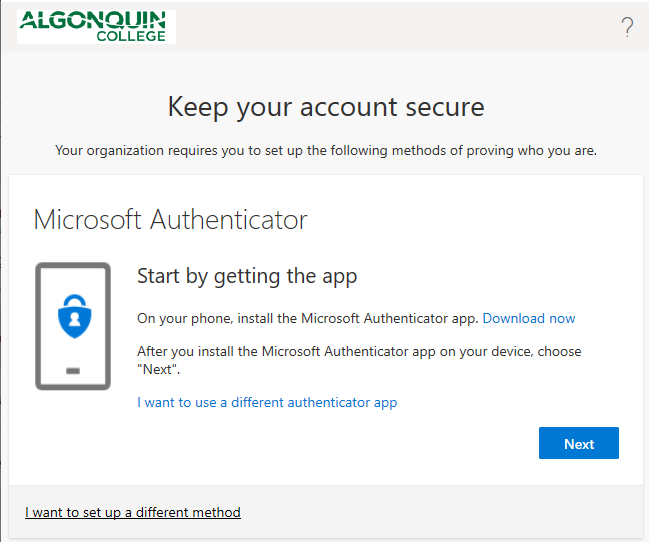
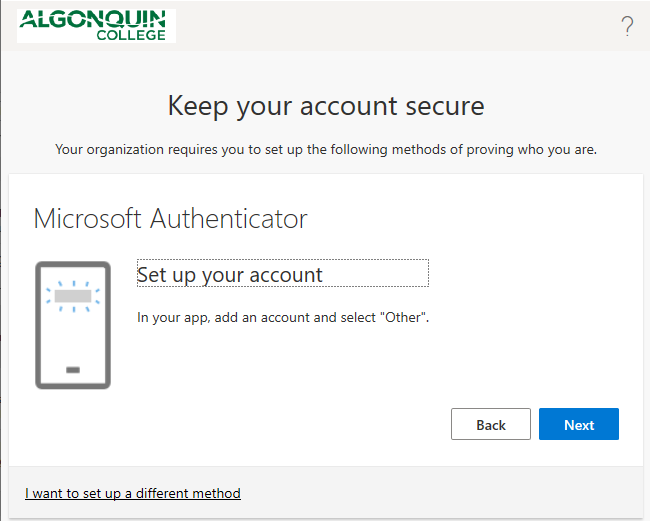
4. Return to your browser and select ‘Next’ on the ‘Start by getting the app’ dialog box in your web browser. Select ‘Next’ on the ‘Set up your account’ dialog box in your web browser.
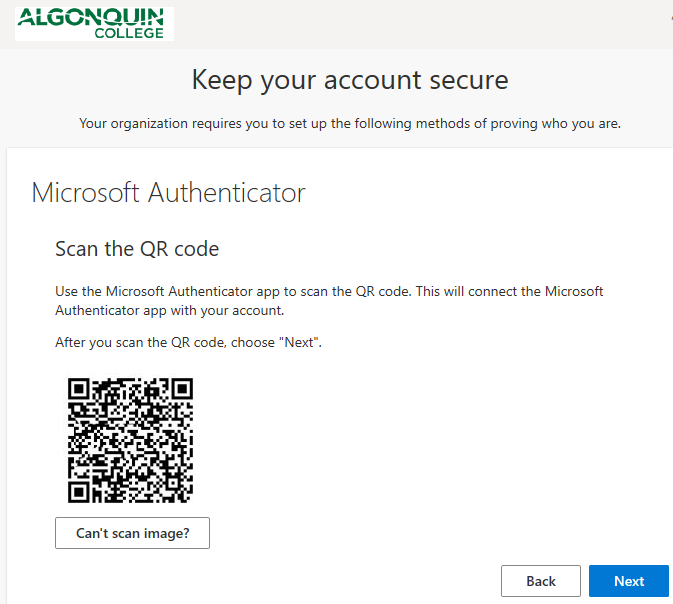
5. A dialog box with a QR code will be displayed. Leave this open while you proceed with Setting up the MS Authenticator on your device.
Setting up MS Authenticator
1.Open the Microsoft Authenticator App on your mobile device. Allow notifications, if prompted.
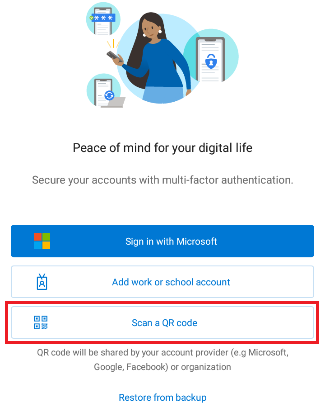
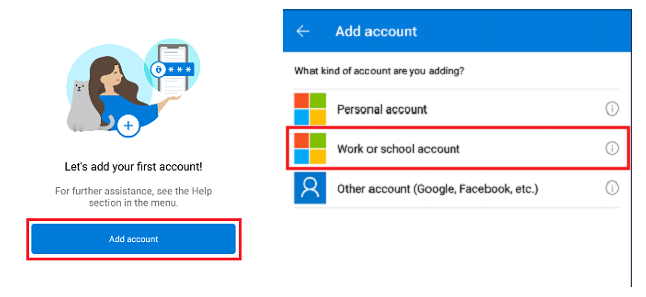
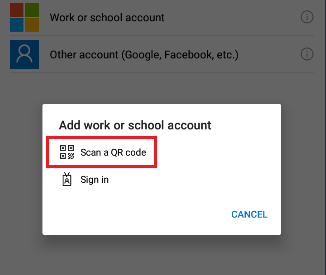
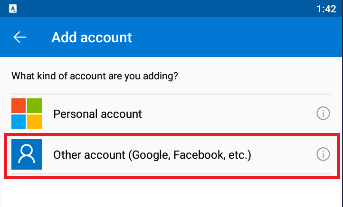
2. Depending on if you are opening the Authenticator App for the first time (Fig 1) or setting an additional account in the app (Fig 2), your view will be different. Users who do not see Work or school account (Fig 3) need to select Other account.
Fig 1.
Fig. 2
Fig. 3
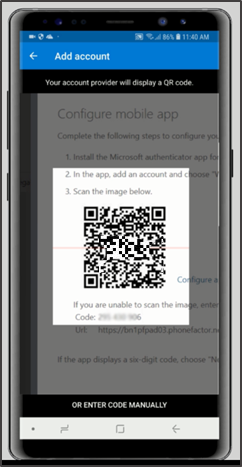
3. Select ‘Scan a QR code’ on your mobile device.
4. Position the QR Scanner over the middle of the QR code in your web browser, and it will automatically recognize it and create the account.
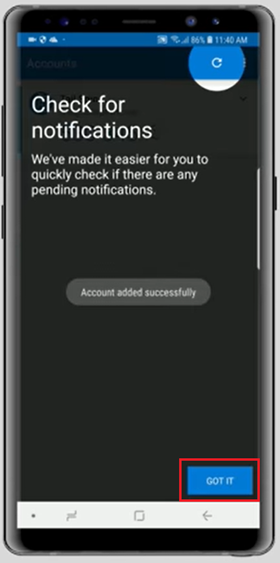
5. Select ‘GOT IT’.
6. Return to your browser where and select ‘Next’ on the ‘Configure mobile app’ QR page.
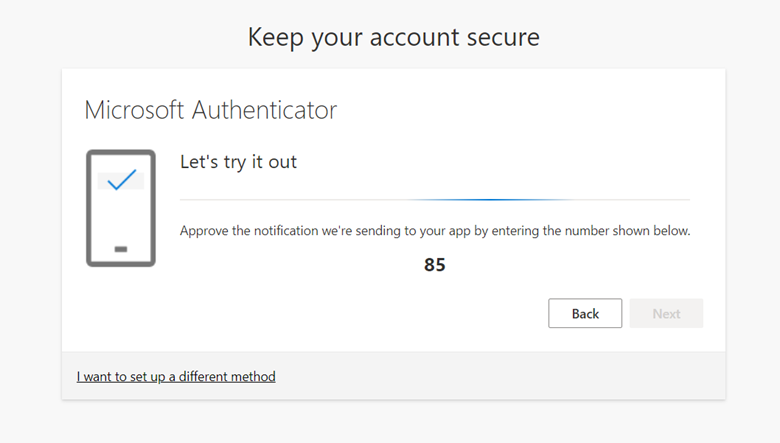
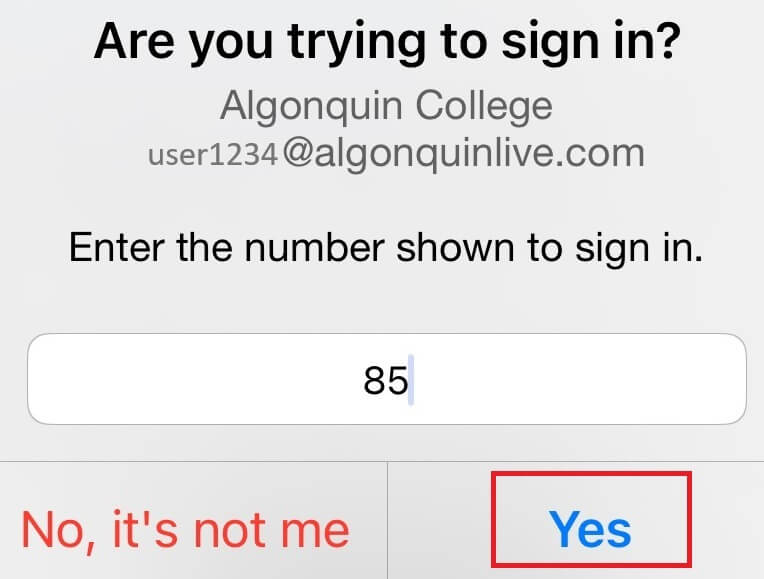
7. The web browser will send a Number Matching Notification to your mobile device. Enter to number shows on screen to complete the configuration.
8. Once you enter the number on the app and click ‘Yes’ to approve the notification, the process will be completed.
9. Select ‘Next.’
10. Select ‘Done.’
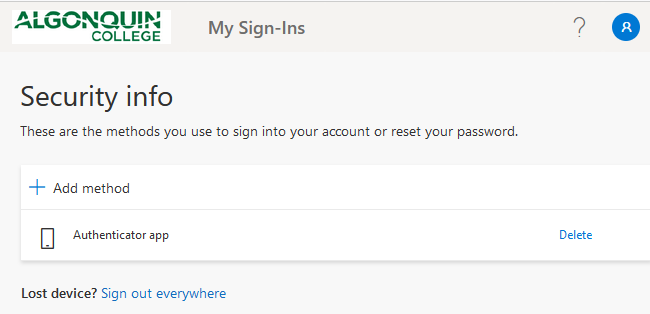
If the previous step is completed successfully, you will see the Authenticator App listed as a Sign-In method.
Devices older than Android 7.0 or iOS 10.0
If you have already downloaded Microsoft Authenticator to your mobile device, go to step 4 below.
1. Open the app store on your device
2. Search for ‘Microsoft Authenticator’.
3. Select ‘Install’ or ‘Get’, depending on your device.
4. Return to your browser and select ‘Next’ on the ‘Start by getting the app’ dialog box in your web browser. Select ‘Next’ on the ‘Set up your account’ dialog box in your web browser.
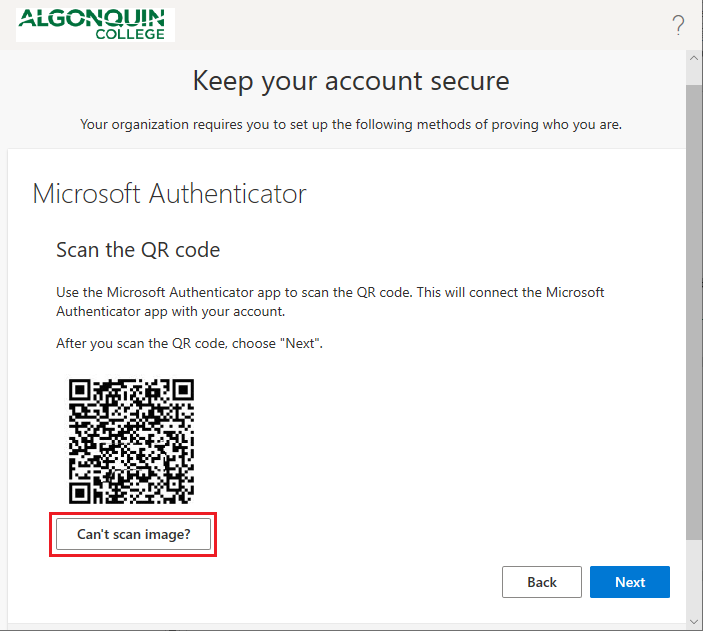
5. In your web browser, select ‘Can’t scan image?’ rather than scanning the QR code.
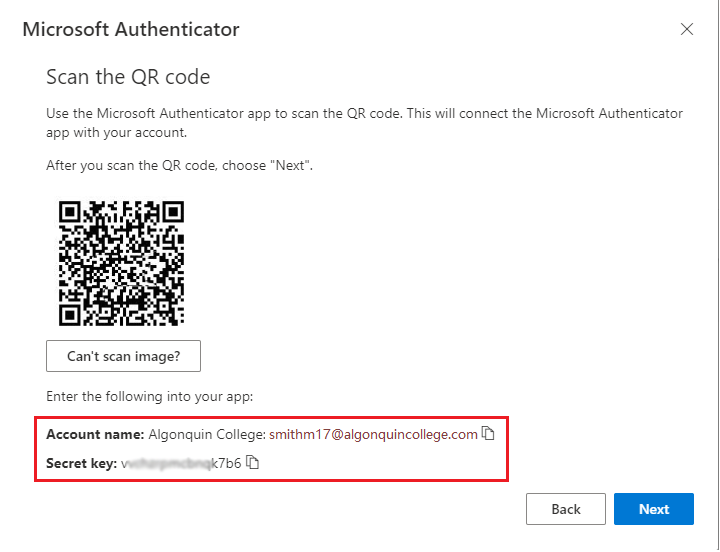
6. You will see your Account Name and a Secret Key. Leave this window open as you will use this information in setting up the Authenticator App on your device.
Setting Up MS Authenticator
1.Open the Microsoft Authenticator App on your mobile device. Allow notifications, if prompted.
2. Depending on if you are opening the Authenticator App for the first time (Fig 1) or setting an additional account in the app (Fig 2), your view will be different. Users who do not see Work or school account (Fig 3) need to select Other account.
Fig 1.
Fig. 2
Fig. 3
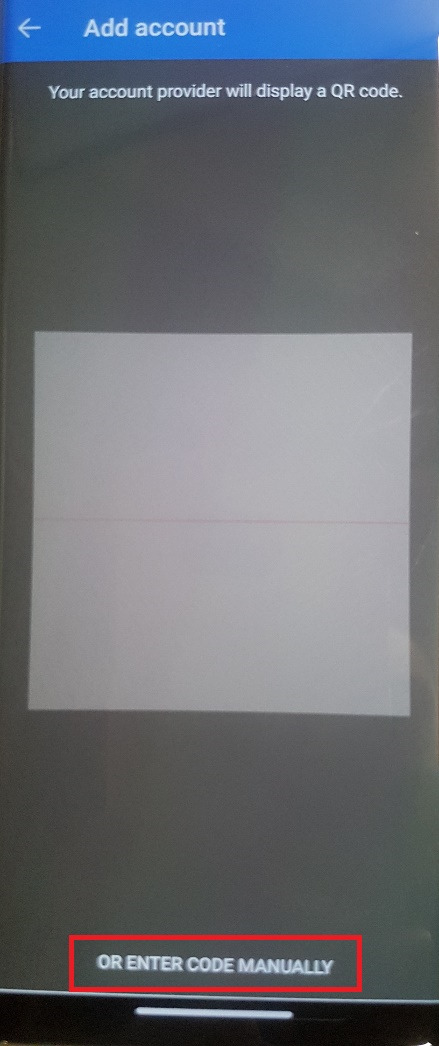
3. From the QR Scanner view, select the option to ‘Enter Code Manually’
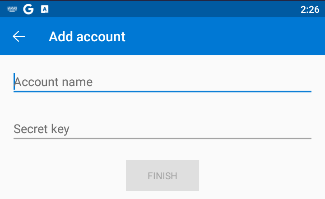
4. Using your Account Name and a Secret Key from your browser, enter this information into the new prompt in the Authenticator App. Select ‘Finish.’
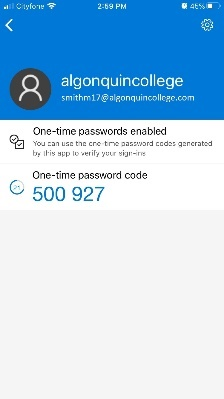
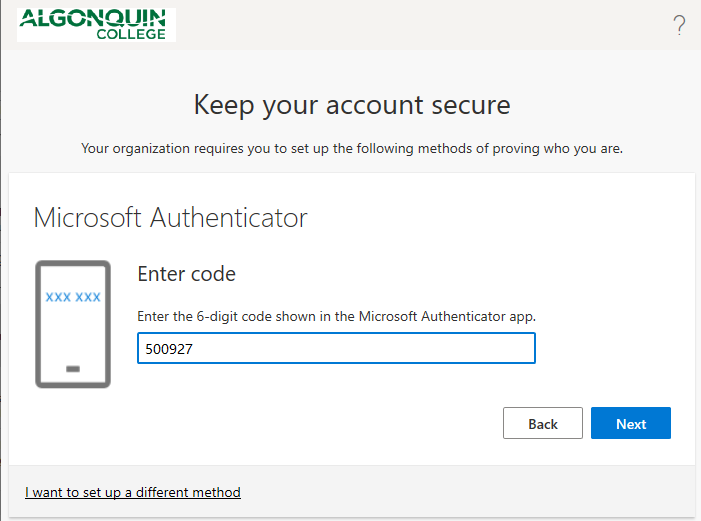
5. On the browser it will prompt you to enter the 6-digit code from your MS Authenticator App. Enter the code displaying on your phone screen to finalize your setup.
6. Enter a backup mobile device phone number to use in case you have lost or forgotten your mobile device, if you wish. Select ‘Next.’
7. Select ‘Done.’
8. If the previous step is completed successfully, you will see the Authenticator App listed as a Sign-In method.
Proceed to Step 3: Setting the Authenticator App as the default MFA method.
Step 3/4: Setting the Authenticator App as the default authentication method
How to set the Authenticator App as the default authentication method
1. On your computer, open a browser go go to http://liveac.algonquincollege.com/
2. Sign in with your Algonquin College email address and password
3. You will be signed into your email/outlook on the web. In the top right corner, locate your profile icon (round icon with your initials or photo) and click on it, then click ‘View account’
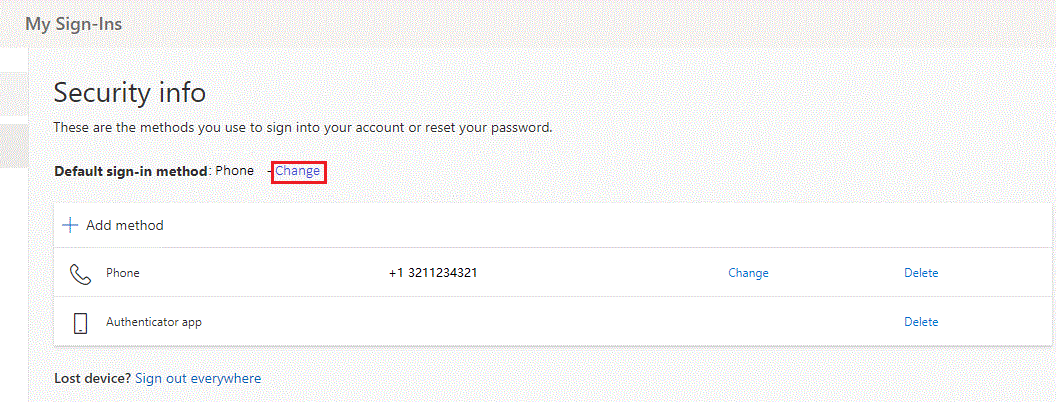
4. On the next page, click ‘Update info’ under ‘Security Info’
5. Select ‘Change’ next to the Default sign-in method
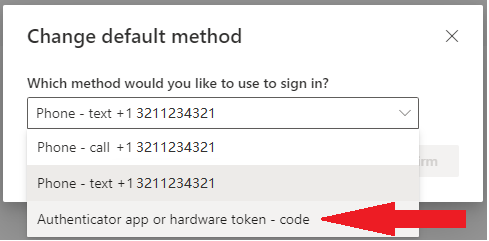
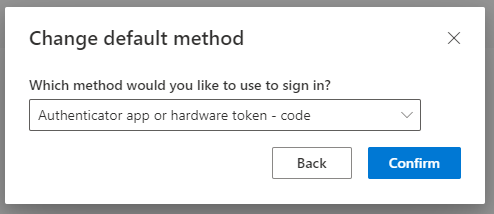
5. Click on the arrow to display the available methods and select ‘Authenticator app or hardware token – code’
6. Select ‘Confirm’
You will now see the ‘Authenticator app or hardware token – code’ next to the Default sign-in method
You have set ‘Authenticator app’ as your default authentication method.
Step 4/4 Configure Cisco AnyConnect and use Microsoft Authenticator to sign into VPN
Select the Cisco AnyConnect application version that matches your device’s operating system.
Downloading and Installing Cisco AnyConnect Secure Client – Windows
Please note that majority of College issued laptops have the required Cisco Client/App installed, use the search function on your laptop to locate it, if you do not have it, please follow the instructions to download and install it.
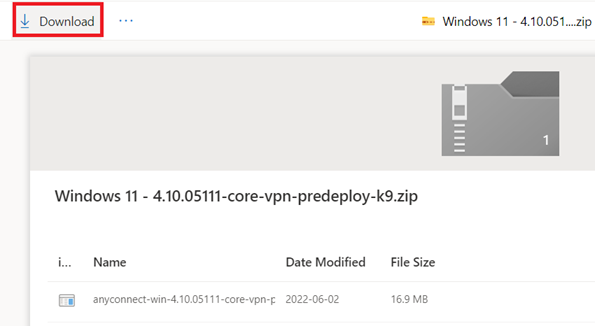
1. Follow the link to access the Cisco AnyConnect – Windows file (if prompted, log in using your full college email and network account password.)
2. Click the ‘Download’ button in the top left corner of the page.
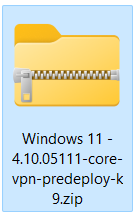
3. Once downloaded, locate the file and double click to open it.
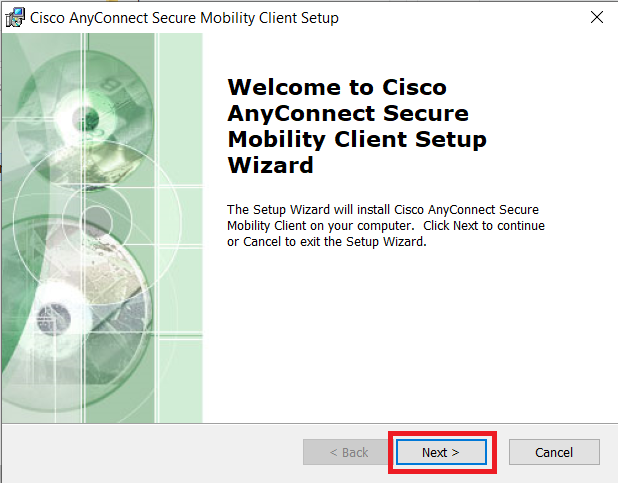
4. Next, double-click the installer file to begin the installation
5. Click ‘Next’.
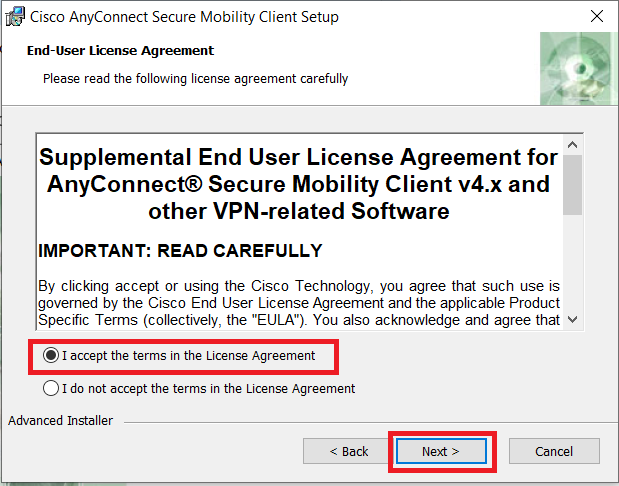
6. Select ‘I accept the terms…’ and click ‘Next’.
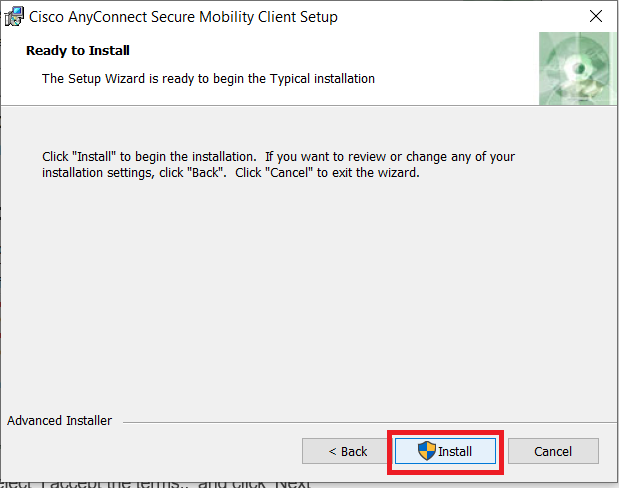
7. Click ‘Install’ to begin the installation.
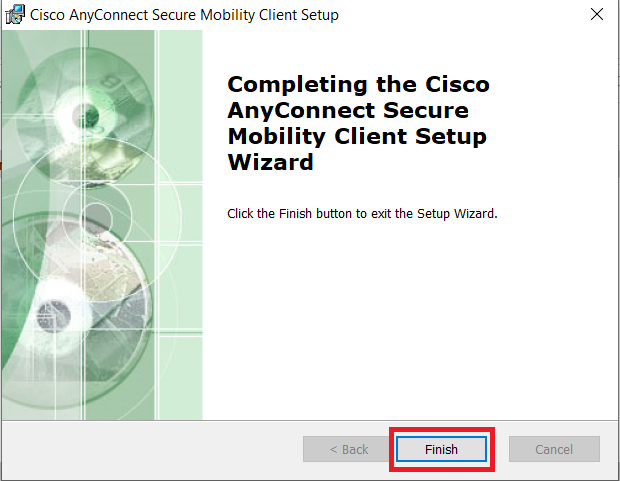
8. Click ‘Finish’ to complete the installation.
Once the installation process is complete, you can proceed to the next step “Login using the CISCO AnyConnect Secure Client“
Downloading and Installing Cisco AnyConnect Secure Client – MacOS
Please note that majority of College issued laptops have the required Cisco Client/App installed, use the search function on your laptop to locate it, if you do not have it, please follow the instructions to download and install it.
1. Click on the link below appropriate version for you operating system.
Note: If prompted login using your full college e-mail address and network account password. Once logged in, you will have the option to download the file.
64 Bit MacOS File Name: AnyConnect – MacOS 64 Bit
64 Bit Big Sur, MacOS 11 : AnyConnect -MacOS11_64bit
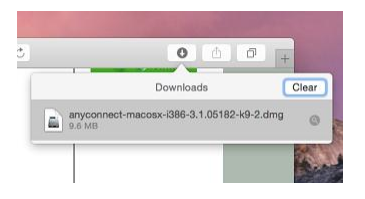
2. Download the required file.
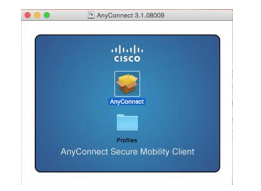
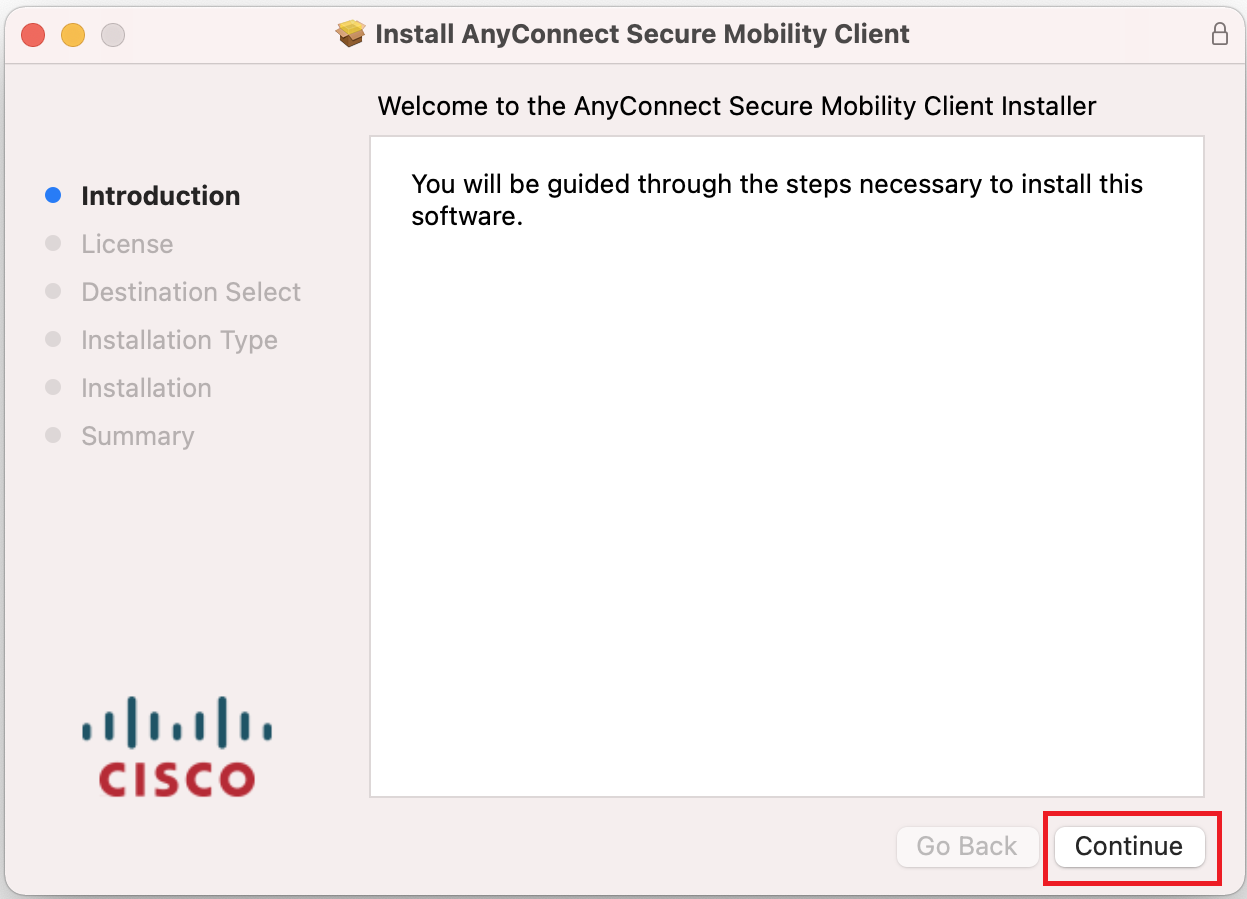
3. Find the Anyconnect DMG file in your downloads folder and double click it to mount the image and open the location of the install file.
4. Press ‘Continue’.
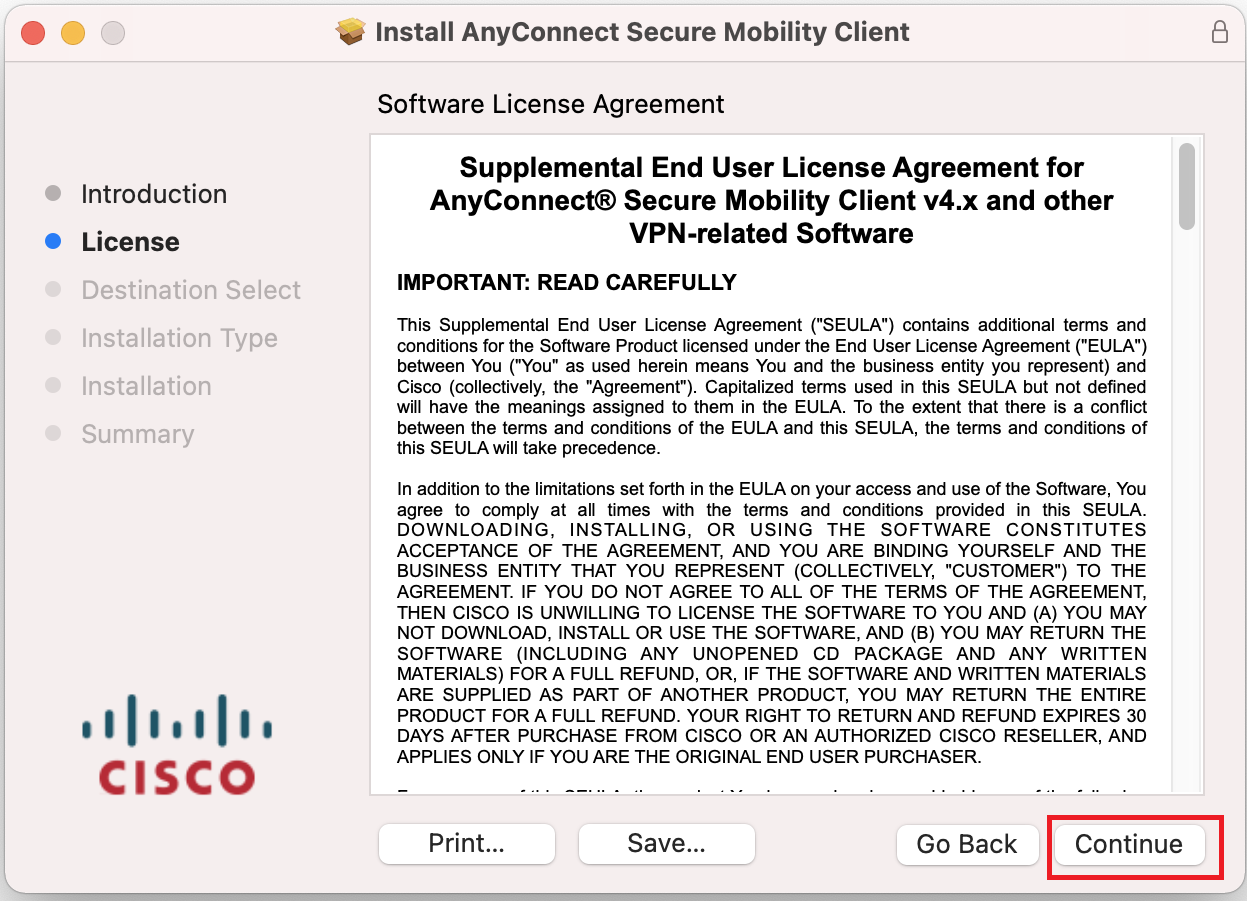
5. Press ‘Continue’.
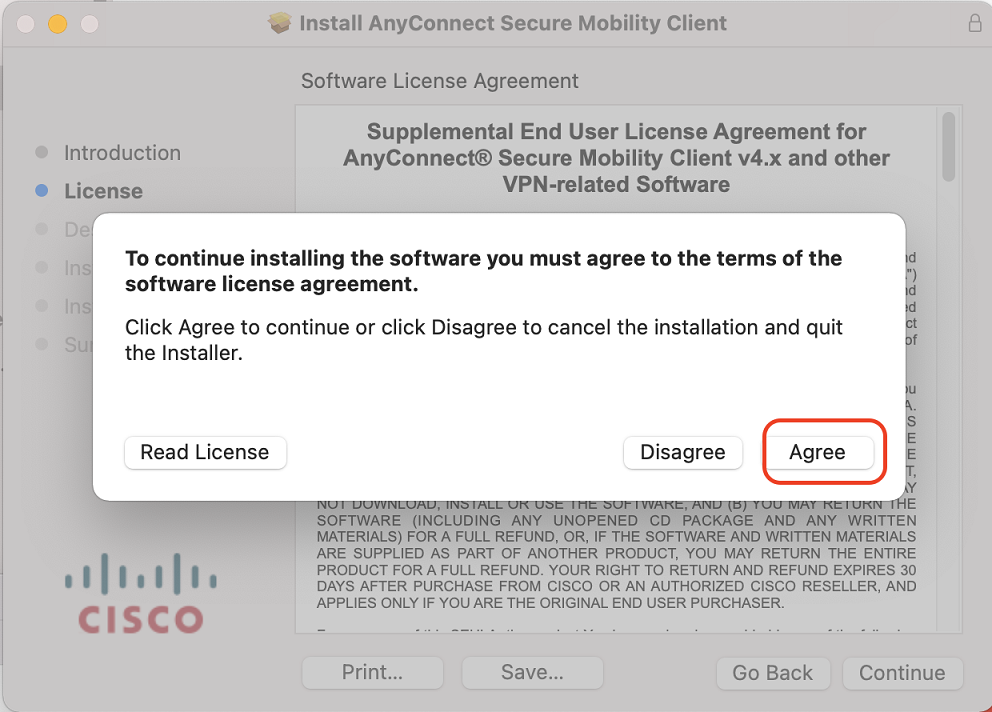
6. Click ‘Agree’ to continue.
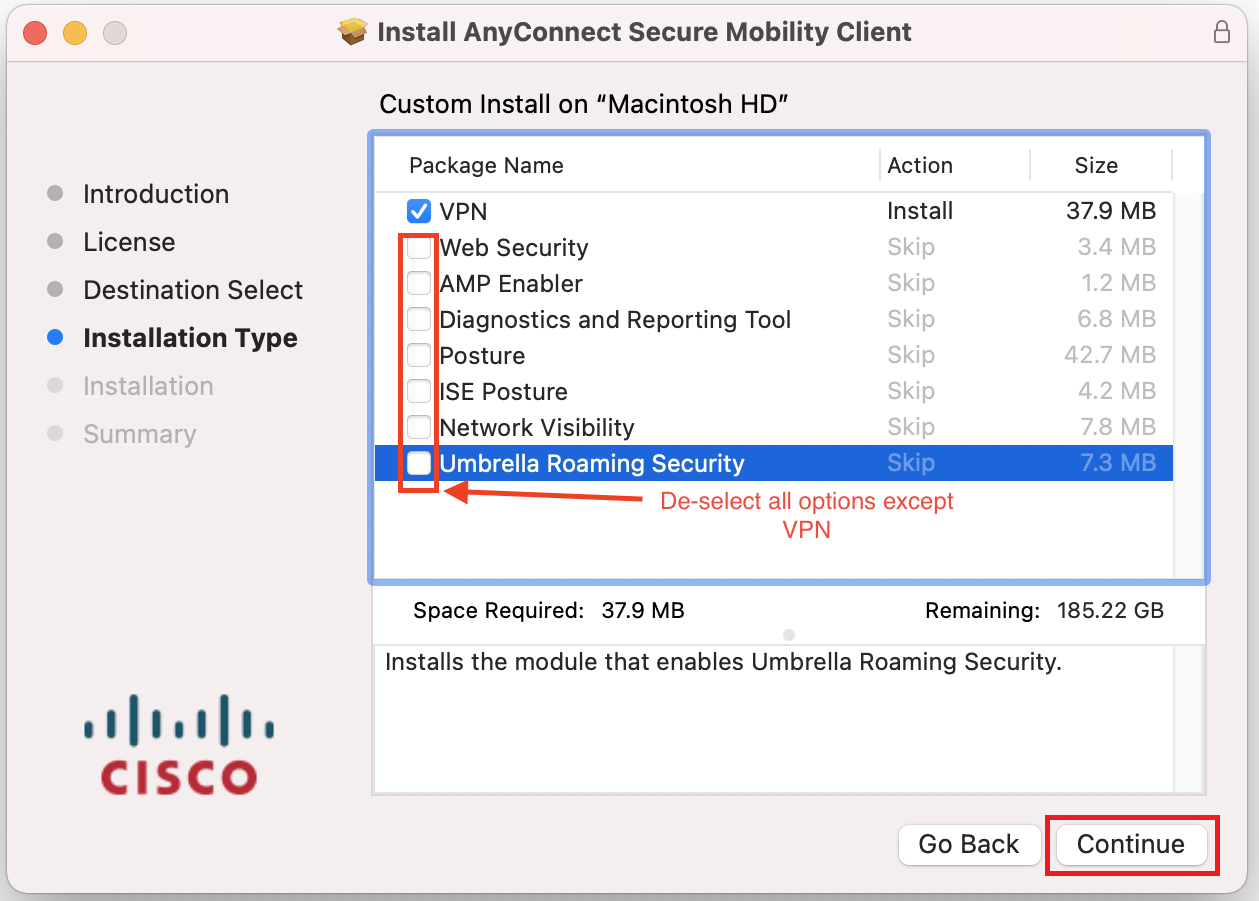
7. Deselect all options except VPN and press ‘Continue’.
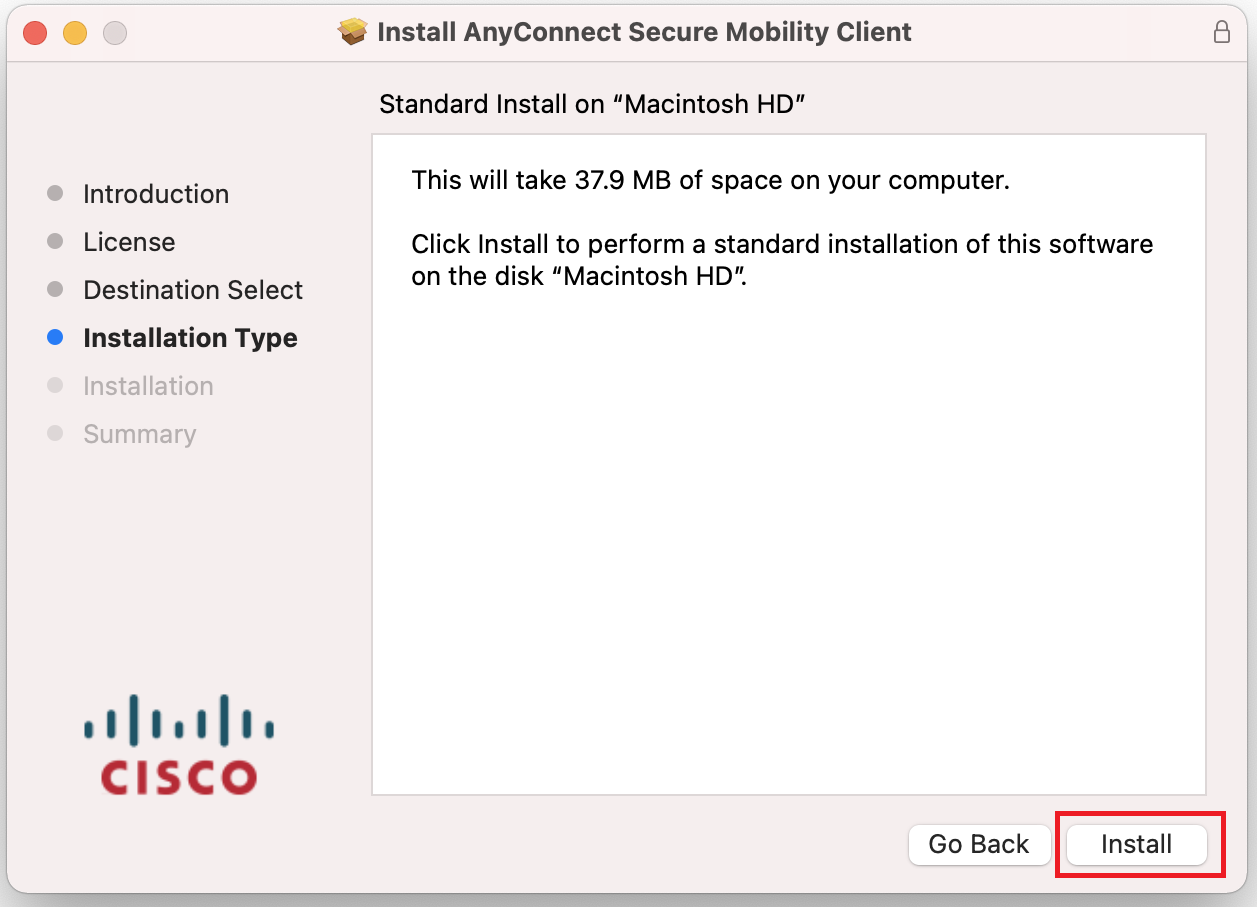
8. Press install to start the installation.
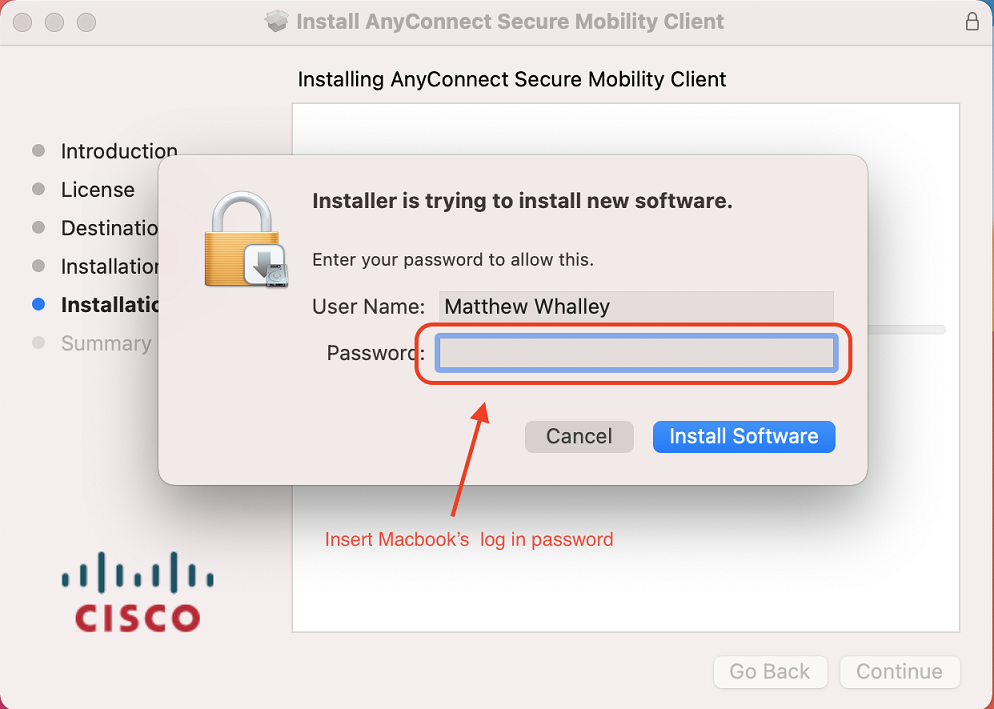
9. If prompted input your Macbook login password and press “Install Software“
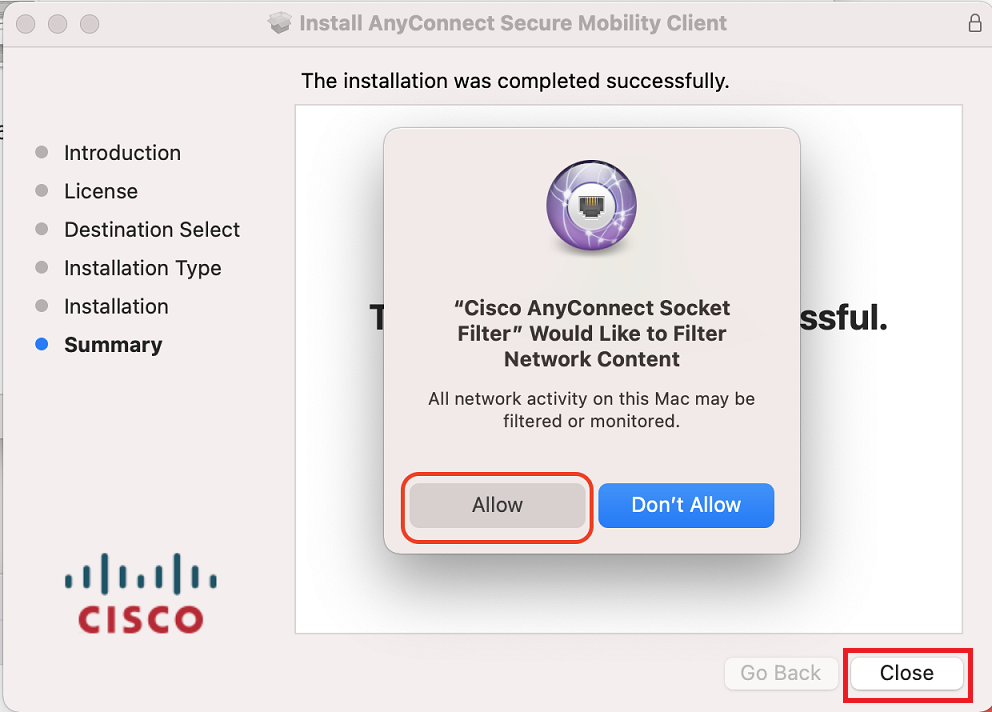
10. When prompted press ‘Allow’ and press ‘Close’ to complete the installation.
- If applicable, press “Move to Trash” to clean up the installer from your device if prompted.
You can now proceed to the next step “Login using the CISCO AnyConnect Secure Client”
How to use the Microsoft Authenticator App to sign into VPN
Logging into the VPN
Note: VPN will not work while you are on campus.
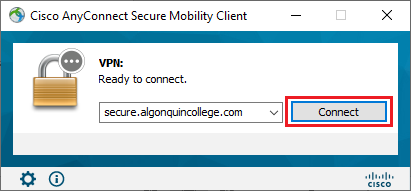
1. Open ‘Cisco AnyConnect’
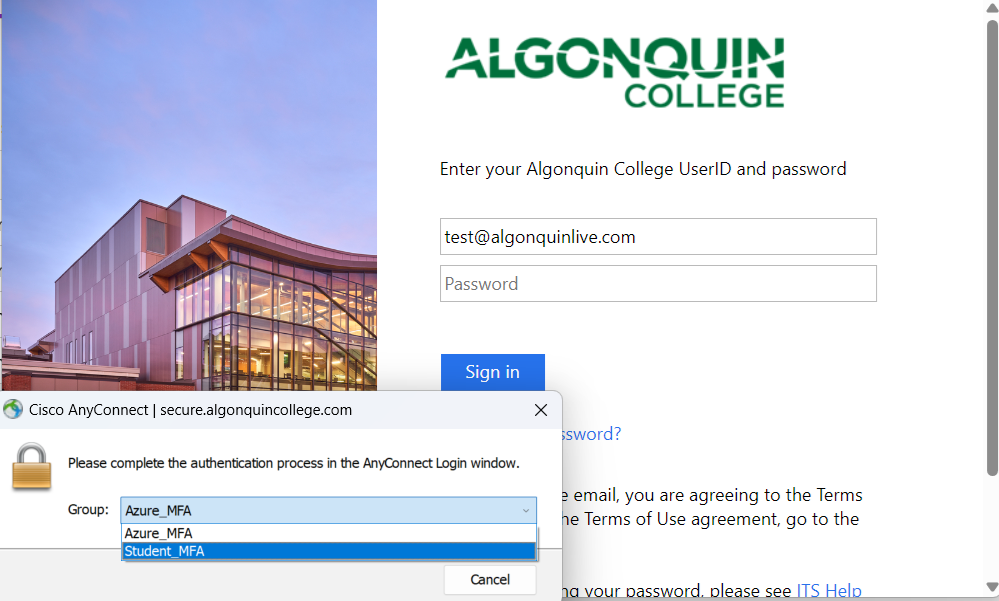
2. If connecting for the first time, type in ‘secure.algonquincollege.com’ into the connection window.
Select ‘Connect’ in the popup window.
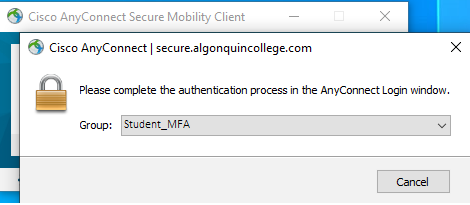
3. Choose ‘Student_MFA’ from the Group drop down menu to use the new method of MFA. This window might be hidden by the larger sign-in window.
The next time you sign into VPN, you will not have to do this step, Student_MFA will be the default selection in the Group drop down menu.
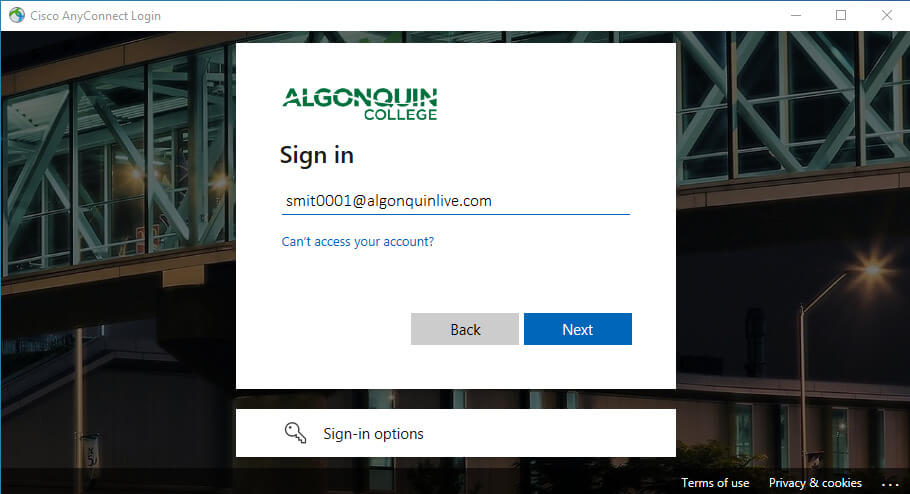
4. Your VPN Sign In Prompt will change to a new User Interface.
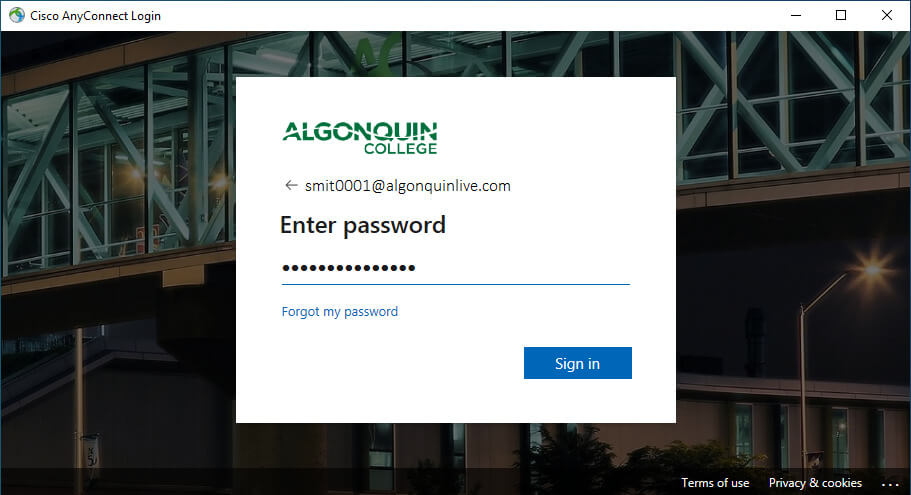
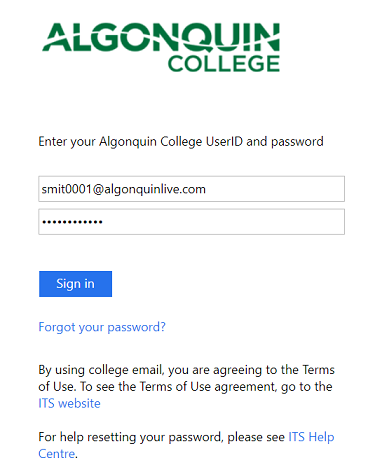
5. Enter your email address, and password when prompted.
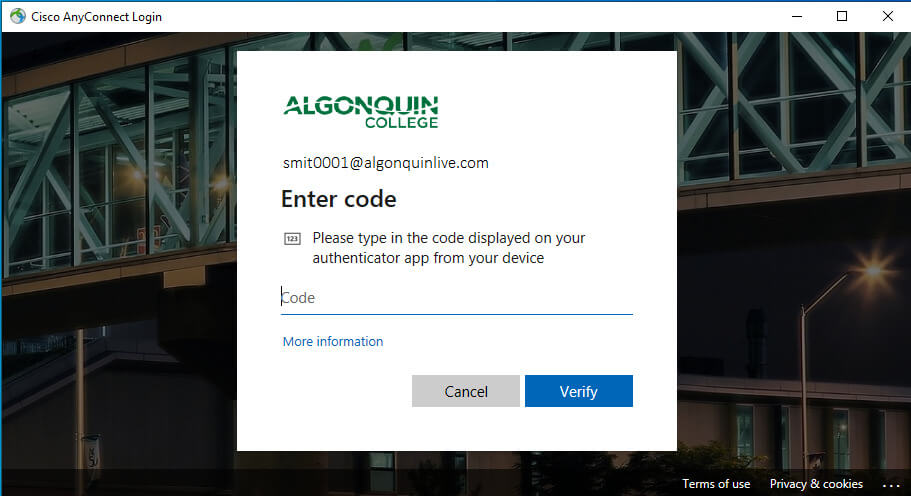
6. Enter the code from the Microsoft Authenticator app or hardware token into the MFA ‘Code’ field and select ‘Verify.’
In the past, this is where you would have entered the code from Entrust soft token or the grid card.
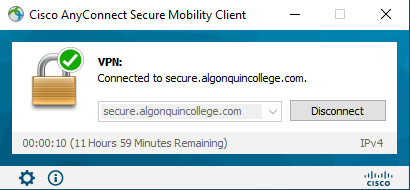
CONGRATULATIONS! You have successfully logged into the VPN.
Multi-Factor Authentication Frequently Asked Questions
If I already have the Microsoft Authenticator app, do I need to reinstall it?
If you already use the Microsoft Authenticator app for other services, you don’t need to reinstall it. You can register your Algonquin account.
Why is it important?
Security breaches due to compromised credentials have unfortunately become a regular occurrence. With an increasing number of passwords to remember, people are prone to re-use the same passwords for many accounts or to use passwords with easy-to-use and easy-to-access information (date of birth, names of family members or pets, etc.). When other non-College services (social networks, websites, etc.) have breaches, these in turn can lead to your credentials being compromised and used to access confidential or restricted College information.
Multi-Factor Authentication (MFA) is an additional service in the authentication process. It validates the identity of the user accessing online systems and applications. MFA works on these principles: what the user knows (their password), what the user has (their mobile phone or a physical device that generates one-time passwords).
What is multi-factor authenticaton?
Authentication is the process of verifying a person’s identity. It answers the question, “Who are you?” Multi-factor authentication uses both a password and a one-time code provided through an application on a mobile device.