Back pain? We have got you covered!

While we all find ourselves adjusting to the new ‘normal’ of working or studying from home, it has become very challenging to form new habits to push you towards your personal health goals.
You have probably been spending more time than ever sitting hunched over your laptops, clicking manically and staring at screens all day long. Not only that, unless you’re lucky enough to have a home office or studying area, your new workspaces and study spaces are sofas, kitchen tables, or even worse, your beds.
You are not built to be kept in a seated position for extended periods of time, and doing so results in several postural deficiencies that can lead to neck and lower back pain. For now, let’s keep things simple and focus on the latter of the two, that dreaded nemesis of every desk jockey; low back pain.
How to get moving?
Yoga studios and gyms are closed for the foreseeable future and while some of us can sneak in home workouts, most people, especially those of you with children will have a million and one better things to do with any free time that you can find.
The good news is that a few simple exercises can help combat the negative effects of sitting all day. Even better, they can all be done in 5-10 minutes!

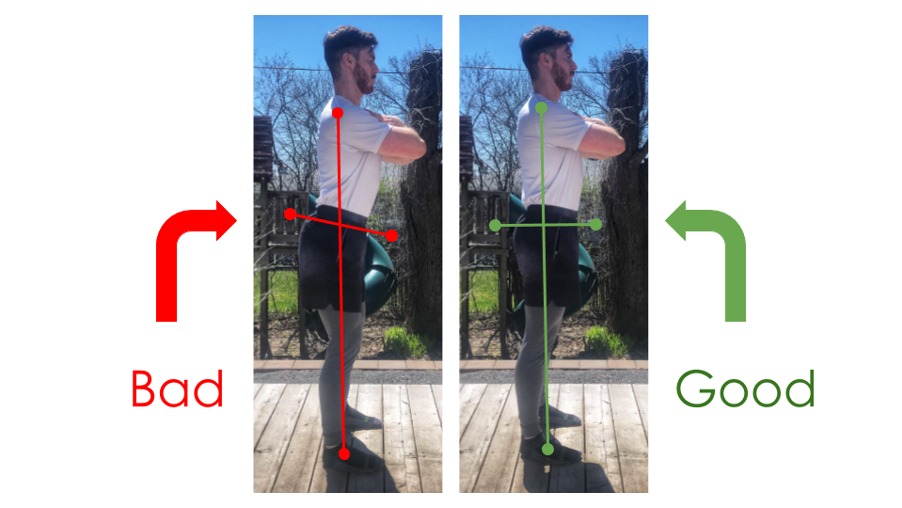
Before we get to the exercises, let me give you a little insight into why sitting at a desk wreaks havoc on our posture. The most prevalent repercussions that arise from sitting for too long are tight hips, weak gluteal muscles, tight hamstrings and weak abdominal muscles. As a result of these, your pelvis drops forward, your belly protrudes in front of you like an infant, and your butt sticks out like an Instagram model. This means that your poor spinal column is taking a beating and the discs between your lumbar vertebrae get pinched and inflamed. Yes, ouch!
Here’s what to do the fix this issue almost instantly:
Exercise 1: Foam Roll Your Quads
Foam rolling can be effective at alleviating muscle soreness as well as increasing blood flow to the targeted area. The subsequent increase in muscle and fascial elasticity helps improve joint mobility, keeping your body healthy and pain free.


- Begin in a forearm plank position with the foam roller under one of your quads, slightly below the crease of your hips.
- Bracing yourself with your forearms and core, slowly roll down the roller until it reaches just above your knees. Then, roll in the opposite direction until you reach back to your hip flexors.
- When you hit a tender spot, pause for a few breaths and try to let yourself sink deeper into the roller. You can also roll side to side on these points to help them release.
- Perform for 30-60 seconds per side and move on to exercise 2
Exercise 2: Hip Flexor Stretch
This exercise is also known as the ‘couch stretch’ as you can perform it from the comfort of your couch – However, it will be the most painful 5 minutes of tv you will ever watch.


- Take a half kneeling position facing away from a stool or chair with your right knee on a mat or cushion.
- Place your shin along the lip of the seat with your toes pointed upward.
- Keep your right thigh in line with your body and position your left leg in front with your knee aligned above your ankle.
- Sit up straight with your chest proud and brace your core.
- Keeping your hips square, contract your right glute muscle for 5-10 seconds and then relax. Repeat for a total of 60 seconds and then switch legs.
- For an easier variation of this stretch, you can keep your shin on the ground.
Exercise 3: Glute Bridge
Now that you’ve stretched the tight problem areas at the front of the body, it’s time to activate the weakened muscles on the back. The glute bridge will strengthen your glutes and hamstrings to help improve posture and protect your lower back when standing and sitting.


- Start by lying on your back with your knees bent and your feet about 8 inches from your glutes.
- Using your abs, brace your core to prevent any arching of the back
- Drive your heels into the mat to lift your hips and lower back off the ground.
- Try to fully contract your glutes and hamstring while keeping your heels pressed into the mat.
- You should feel all of the tension in your glutes. If you find that pressure builds in your lower back, you are performing the exercise incorrectly.
Exercise 4: Dead Bug
In order to bring your pelvis back to a healthy, neutral position you must learn to engage our core musculature in a way that promotes postural control. A strong core can be your best weapon in the fight against back pain. However, countless amounts of crunches and leg raises will generally only exacerbate the issue. The dead bug challenges you to maintain a neutral pelvis while moving your limbs away from the centre of your body. It might look like a beginner exercise but I’ve seen professional athletes tremble and turn beet red from the challenge that dead bugs present.


- Lie on your back in a pose that looks like you fell backwards off of your office chair; head flat on the ground, arms perpendicular to the floor, knees and hips both flexed to 90 degrees and toes pointed to the ceiling.
- Flex your abs hard and try to maintain a natural lower back curve.
- Begin by pushing your heel away from your body and make sure that your lower back and pelvis do not rotate forward and upwards.
- The only movement occurring should be at the leg.
- Hold the leg fully extended, with the heel 1-2 inches from the floor for 2 seconds before returning to your starting position.
- Repeat for the opposite side.
- To progress this exercise, move the opposite hand and foot away from your midline and try to make yourself as long as possible while maintaining a strong core.
Putting it all together:
- Foam Rolling: 2 x 30-60 seconds / side
- Hip Flexor Stretch : 2 x 30 seconds / side
- Glute Bridge: 2 x 15 reps
- Dead Bug: 2 x 6 reps/ side
Give this routine a go and I am sure you will feel better!
*Article written by Brian Kehoe. He is a professor in the Fitness and Health Promotion program at Algonquin College.


